A 403 forbidden error appears to be serious enough to cause panic. WordPress errors, on the other hand, aren’t as frightening as they appear. But, before we get started on the fixes, let’s learn a little bit about this error and its causes so you can understand and fix the underlying causes ahead of time. Are you short on time? Let’s get right to the fixes.
What is 403 forbidden error?
This HTTP status code is displayed when you attempt to access a prohibited resource. This error code denotes a permission error, which is frequently caused by indexing issues, poorly coded plugins, an empty site directory, or ownership issues.
What Is the root cause of the 403 forbidden error?
The improper configuration that denies access to the requested resource is a major reason why the 403 error appears on WordPress sites.
Other reasons include:
- A corrupt .htaccess file
- A poorly coded plugin
- Incorrect file permissions
What are the various types of 403 forbidden errors?
In different versions, you may encounter 403 forbidden errors, some of which are as follows:
- 403 Forbidden
- Forbidden
- Error 403
- HTTP Error 403 – Forbidden
- Forbidden: You don’t have permission to access [directory] on this server
- 403 forbidden error was encountered while trying to use an error document to handle the request
How to fix the 403 forbidden WordPress error
Because the server does not allow your browser to load the scripts, the 403 error can be difficult to resolve. However, there are several methods for resolving the 403 forbidden error on WordPress sites. The easy fixes are listed below, and I recommend following the fixes in the order listed to detect and fix the error as soon as possible.
1. Clear your browsing cache
The simplest solution to the 403 error is to clear your browser’s cache, and a hard refresh is always recommended whenever you encounter a WordPress error. The 403 error could be caused by the browser’s cache. Clearing your browser’s cache and cookies, or visiting your website in incognito mode, may help.
2. Rollback to a running version from your hosting backup
You can revert the changes and roll back to the previous running version if your hosting provider provides an application or server-level backup. Reverting to the previous working version may help you avoid the 403 error. For example, suppose your website was operational on December 31 but not on January 1. In that case, a few clicks will take you back to the previous working version.
3. Check .htaccess file
A corrupted .htaccess file is another cause of a 403 forbidden WordPress error. Any FTP manager can repair a .htaccess file in a matter of seconds.
- To begin, use an FTP client to connect to your server.
- Navigate to the .htaccess file in the public html directory.

- To be safe, right-click on the .htaccess file and download the file.
- After downloading the file, delete the .htaccess file on server.
- Now, open your browser and refresh the page to see if the 403 error has been resolved. (If not upload the downloaded .htaccess file)
If deleting the .htaccess file resolves the problem, it confirms that the error was caused by a corrupted .htaccess file. Now we need to generate clean .htaccess file. Follow these steps to create a clean .htaccess file:
- Log in to your WordPress dashboard and go to Settings > Permalinks.
- You’ll be redirected to the permalink settings page. Just scroll down and click on save changes bottom of the page to generate a new .htaccess file.
WordPress will now attempt to create a .htaccess file. If you continue to receive the error “.htaccess file is not writable,” you must manually create the .htaccess file. Follow these steps to create a .htaccess file manually:
- Create a text file on your computer first.
- Copy and paste the provided code into the that file.
<IfModule mod_rewrite.c>
   RewriteEngine On
   RewriteBase /
   RewriteRule ^index.php$ - [L]
   RewriteCond %{REQUEST_FILENAME} !-f
   RewriteCond %{REQUEST_FILENAME} !-d
   RewriteRule . /index.php [L]
</IfModule>
- Rename your text file’s file extension from .txt to .htaccess.
- And then upload your .htaccess file to the root directory of your website using the FTP software or file manager in your CPanel.
If the error persists, proceed to the following troubleshooting methods.
4. Check file permissions
Many WordPress files necessitate access permissions. If those permissions are incorrect, the server will return a 403 permission denied error, indicating that the requested file does not exist.
- Connect to your WordPress website using an FTP client.
- Using an FTP client, connect to your WordPress website.
- Navigate to the root, right-click public html, and then select the file permissions option.
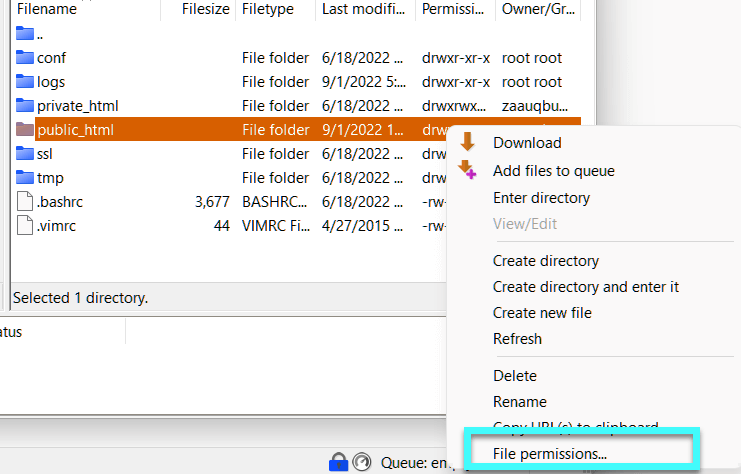
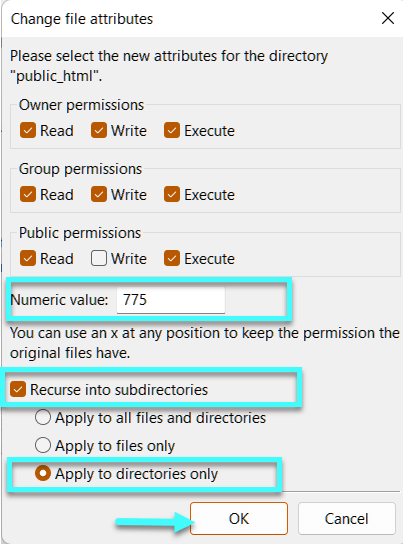
- Make sure the numeric value in the Permission box is 744 or 775.
- Select the ‘Recurse into subdirectories’ checkbox.
- Select the ‘Apply to directories only’ option and click OK.
- Repeat the process for all of the files.
- Make the file permissions 644 or 640.
- Remember to select Recurse into subdirectories > Only apply to files Click OK.

Recheck to see if the 403 forbidden WordPress error has been resolved. If it still appears, proceed to the next step, which is deactivating the plugins.
5. Deactivate All Plugins
On WordPress sites, poorly coded plugins can occasionally cause a 403 forbidden error. As a result, we can disable all of our plugins and see if the problem has been resolved.
- You can use an FTP client like FileZilla to access your WordPress files once more.
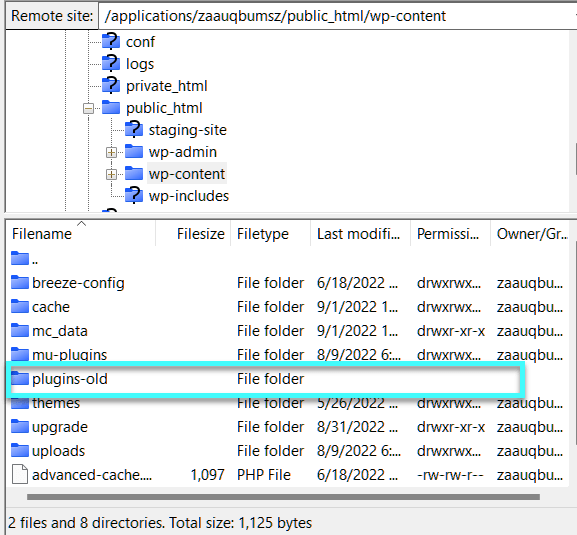
- Navigate to public html > wp-content
- Change the name of the plugins folder (I changed it to plugins-old).
- Return to your browser and refresh it. If the website resumes normal operation, the plugins were the source of the problem.
- Change the name of your plugins-old folder to plugins.
- After changing the folder name, navigate to the WordPress Dashboard > Plugins > Installed Plugins.
- You’ll notice that all plugins are disabled by default.
- Activate each plugin and see if your website works afterward to identify the problematic plugin.
6. Get in touch with your hosting support
If you’ve tried everything and still get the 403 error, your last option is to contact your hosting provider. Many managed hosting providers provide immediate assistance with these issues.
Summary
I hope you found this guide useful and were able to resolve the “WordPress 403 error” using the solutions provided. Have you come up with any other solutions to this problem? Please share your solutions in the comments section below to help others who are experiencing similar problems.